It is a web framework of Python created by “Tiangolo”. You can read about it from FastAPI from my previous blog, where I talked about how I changed my project from Streamlit to FastAPI .
Let me tell why I needed to learn this? I needed to work on backend project, as I said. I have no experience with backend in FastAPI. So, I went on YouTube, searched for few content regarding how to make APIs in Python and found a good video to start with. I have mention it below, if you want to learn as well.
What I learnt from here is how to build API using FastAPI with LLM integration.
If you don’t about LLM. I can you explain you as LLM stands for Large Language Model. It is an advanced Artificial Intelligence or AI system designed to understand, analyse and generate human like text. These models are trained on vast datasets of text and code, enabling them to perform tasks like answering questions, translating languages, summarising documents and completing text.
LLMs use deep learning techniques, particularly transform architectures, to process information and predict the most probable next word in a given sequence, allowing them to produce coherent and contextually relevant responses.
When you know their key characteristics, right? So, here are some important characteristics of LLMs:
Large-Scale Training: LLMs are large because they are trained on massive datasets of text, such as books and articles from the internet, allowing them to learn grammar, facts and reasoning skills.
Transformer Architecture: Many modern LLMs are built on transformer architectures, which use self attention mechanisms to process entire text sequences in parallel, significantly reducing training time compared to older models.
Natural Language Processing or NLP: LLMs are a key component of NLP, enabling them to understand the complexities and nuances of human language.
Predictive Capabilities: By learning patterns and context from their training data, LLMs can predict the next word in a sentence, which is fundamental to their ability to generate human-like text.
There are different kinds of LLM models, you can google about them if you want to.
I am using local LLM here. I am assuming you don’t know about local LLM. So, I will explain it to you.
A local LLM is a language model that runs directly on you device, rather than in the cloud. You download the model weights and inference code and run everything locally — on your PC, laptop or even a phone (if it is small enough).
Ollama is a tool that makes it easy to run large language models(LLMs) locally on your PC, especially models like LLaMA, Mistral, Gemma, Phi, and others.
It is a lightweight application and a command-line tool that:
Let you download, run and chat with open-source LLMs on your local machine.
It handles model optimization, downloading, and inference for you. It works on Windows, macOS, and Linux as well.
It uses CPU or GPU depending on your system with (GPU support for better speed).
We can chat with LLMs locally using Ollama without internet after setup.
We can run different kind of models here: llama3, mistral, gemma, phi and codellama(for coding)
We can customise or fine-tune our models using .modelfile and integrate with apps like LM Studio, Open WebUi, or even build your own apps.
Postman is a popular software tool used by developers to build, test and manage APIs(Application Programming Interfaces).
How does Postman solves the problem of testing API:
It helps you send request to APIs (like GET, POST, PUT, DELETE) and view the responses.
You can test your API endpoints easily without writing code.
We can organise API requests into collections to keep things neat.
Postman automates API testing with Scripts and Workflows.
We can collaborate with teams by sharing API collections and documentation.
And it also generate API documentation automatically.
Postman is generally used by Backend Developers for testing RESTful or GraphQL APIs. QA engineers use it for API testing. DevOps teams use it to manage API deployments. Anyone working with APIs who wants easier way to interact with them can use Postman.
Auth is short for Authentication, and it is a fundamental concept in computing and security. It refers to verifying the identity of a user, system, or application before granting access to something like a website, an API, or a database.
Authentication asks who are you to give access to the authorised users whom it belongs to.
Basic Auth: Sends username and password in each request(encoded, not encrypted)
API Key: A token(string type) included in the request header or URL to identify the client.
Bearer Token or JWT(JSON Web Token): It a signed token that carries user identity and permissions
OAuth 2.0: It is a secure and delegated authentication ( and used by Google, Facebook, etc.)
Session-based Auth: It works like when user logs in, then server creates session and send session cookie.
SSO(Single Sign-On): It is One login grants access to multiple services (e.g., Google login for many apps).
When testing APIs in Postman, the Auth tab lets you choose how to authenticate:
Add a Bearer Token
Use OAuth 2.0
Pass an API Key
Use Basic Auth
I think enough theory has been done here. If you have more energy to read then let’s go…#
Create a file directory or folder where you can code and open it into your favourite IDE like VS Code.
To create virtual environment, I use uv, it is other than pip.
uv venv # Create virtual environment using uv, you can create venv using pip, the cmd for that will be different.source .venv/bin/activate # This cmd will activate the venv
Make a virtual environment for Python to avoid conflicts with versions and dependencies.
After setup of venv and installation of dependencies create main.py python file, where you will write your code.
from fastapi import FastAPI, Header, HTTPException, Dependsimport ollamaimport osfrom dotenv import load_dotenvload_dotenv()# Using 5, it will limit of the given API key, after that it will not be used. It is working like a credit here.API_KEYS_CREDITS = {os.getenv("API_KEY"): 5}app = FastAPI()def verify_api_key(x_api_key: str = Header(None)): # If there is no API key is given, then the credit will be 0 credits = API_KEYS_CREDITS.get(x_api_key, 0) if credits <=0: raise HTTPException(status_code = 401, detail = "Invalid API Key, or your credits are over.") return x_api_key@app.post("/generate")def generate(prompt: str, x_api_key : str = Depends(verify_api_key)): API_KEYS_CREDITS[x_api_key] -=1 response = ollama.chat(model="gemma3:270m", messages=[{"role" : "user", "content": prompt }]) return {"response": response["message"]["content"]}
Save this file and run Ollama side by side in another terminal.
Ollama run gemma3:270m# You can use other LLM, I am using it is because it is small in size, and I just need to test API.
One thing I forget to tell about the API Key.
You need to set API Key for authentication in the root directory of your project in .env file.
Since we are using local LLM, you can use any random string for API here just for fun but, not do this in production code.
Now, run the python main file using the below command:
uvicorn main:app --reload # this command will run the python file made in fastapi.# It will run the file on the localhost:8000 or http://127.0.0.1:8000/
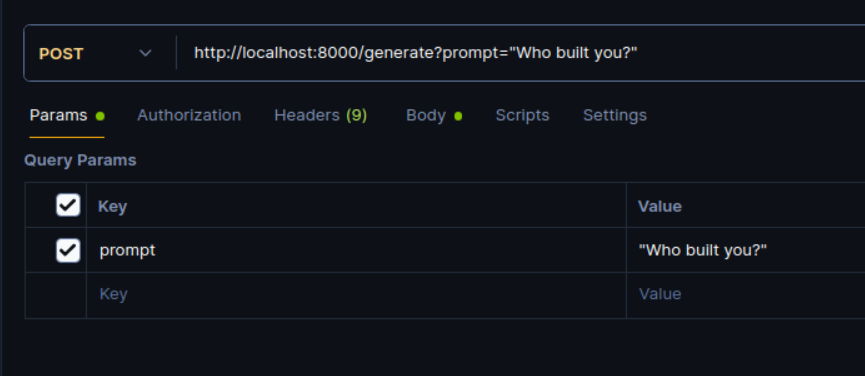
Create a new collection and create post request paste the above link there like this:
In the Headers, you need to add the API key to get Auth.
When you will hit the SEND button, you would get such a response like shown below if everything is perfectly:
{ "response": "The question \"Who built you?\" is a classic and open-ended one. It's a question that has been pondered by philosophers and thinkers for centuries.\n"}
Since, I set a custom limit over usage is 5. After using API credit (5 Credits). The response will be like the below:
{ "detail": "Invalid API Key, or your credits are over."}
The same response you will receive when you have incorrect API key as well.
Caution here is you need to run again the main.py after making changes in .env file.
You may get the response like below:
{'response': "Python is a versatile and popular programming language known for its readability, ease of use, and extensive libraries. It's a dynamic language, meaning it changes its syntax and semantics based on the requirements of the program.\n"}
If any error occurs, try to understand the error, read from Google or do ChatGPT to understand it in depth.